
Desserts
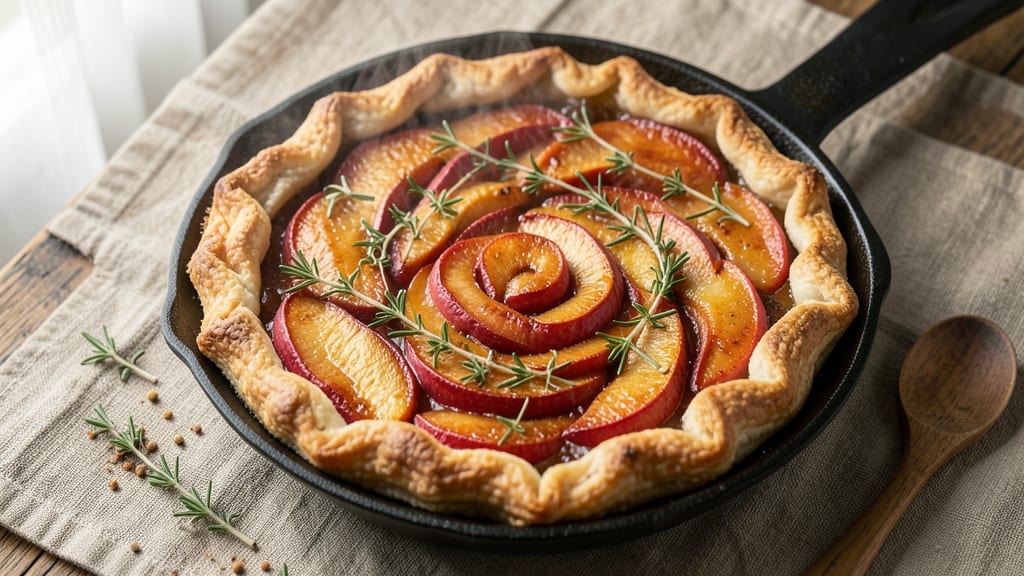
This savory apple pie recipe flips dessert on its head with a golden, herb-infused crust and a filling that balances sweet apples with sharp Gruyère and caramelized onions.
The secret lies in the crust—enriched with fresh thyme and rosemary—while the filling transforms tart apples into a savory, slightly sweet centerpiece that pairs perfectly with sharp cheddar and brown sugar. It’s the kind of pie that feels like a gourmet appetizer rather than a sweet ending.
The beauty of this recipe is its versatility—it works as a 30-minute weeknight dinner or an impressive centerpiece for holiday gatherings. The apples soften just enough to release their natural sugars, while the cheese and onions mellow into a rich, caramelized base.
A sprinkle of flaky sea salt on top before baking adds a final layer of complexity that makes every bite unforgettable.
What sets this apart from traditional apple pie is the herb-infused crust, which adds an earthy depth that complements the savory filling without overpowering it.
The crust stays crisp at the edges while remaining tender enough to hold the filling together, ensuring each slice delivers a perfect balance of textures. It’s the kind of dish that turns a simple apple into something extraordinary.
Once baked, the pie develops a golden, crackly crust with a filling that’s just soft enough to cut through with a fork. Serve it warm with a dollop of crème fraîche or a side of sharp cheddar to enhance the savory notes.
This isn’t just pie—it’s a restaurant-worthy twist on a classic that’s sure to impress.
Ingredients for savory apple pie
Herb-infused crust and spiced filling transform this savory apple pie into a restaurant-worthy centerpiece.
| Ingredient | Amount | Notes |
|---|---|---|
| All-Purpose Flour 🌾 | 2 ½ cups | Sifted for lighter crust |
| Unsalted Butter 🧈 | 1 cup | Cold, cubed for crust |
| Granulated Sugar 🍚 | ¼ cup | Plus 1 tbsp for crust |
| Fresh Thyme Leaves 🌿 | 1 tbsp | Finely chopped, stems removed |
| Fresh Rosemary 🌿 | 1 tbsp | Finely chopped, woody stems discarded |
| Ice Water 💧 | ½ cup | For dough binding |
| Honeycrisp Apples 🍎 | 4 medium | Peeled, sliced 1/4-inch thick |
| Yellow Onions 🧅 | 1 large | Thinly sliced, caramelized |
| Gruyère Cheese 🧀 | 1 cup | Shredded, aged 12+ months |
| Sharp Cheddar Cheese 🧀 | ½ cup | Shredded, aged 6+ months |
| Light Brown Sugar 🍚 | ¼ cup | Packed, for filling |
| Flaky Sea Salt 🧂 | 1 tsp | For crust finishing |
| Extra-Virgin Olive Oil 🫒 | 1 tbsp | For brushing crust |
| Fresh Sage Leaves 🌿 | ¼ cup | Chopped, for filling |
The Gruyère makes this pie extraordinary—look for aged wheels with visible holes and a nutty aroma. Whole Foods or specialty cheese shops carry the best selections, but the pre-shredded kind works in a pinch. For the apples, Honeycrisp or Braeburn hold their shape while caramelizing beautifully. If you can't find them, Granny Smith apples work too—they're tart enough to balance the sweetness. The onions should be sweet and golden when caramelized, so don't rush this step—it's worth the extra 20 minutes.
No Gruyère? Parmigiano-Reggiano or sharp white cheddar add depth, though Gruyère's nutty notes are ideal. Substituting apples? Bosc or Pink Lady both work, but avoid Red Delicious—they're too mealy. The fresh herbs are non-negotiable for that earthy aroma, but if you're out, dried thyme and rosemary at half the amount will do. For the crust, butter-flavored shortening can replace butter if you're avoiding dairy, though the flavor won't be quite the same. The sea salt should be flaky, like Maldon or Jacobsen—table salt won't give the same crispy texture.
This pie tastes even better the next day—store leftovers covered at room temperature for up to 2 days. For longer storage, wrap tightly in foil and refrigerate for up to 5 days. Freeze individual slices for up to 3 months by wrapping them in plastic wrap before placing in a freezer bag. Reheat in a 350°F oven for 10-15 minutes to restore crispness. The crust reheats beautifully, but if it softens, just brush with a little olive oil and broil for 2 minutes to crisp it back up.
Why You'll Love This Recipe
- No-Fuss Assembly: I’ll be real—this crust comes together in five minutes with just flour, butter, and a pinch of salt. No rolling pins, no stress, just press, fold, and bake. That’s it.
- Herb-Infused Magic: The thyme and rosemary turn sweet apples into something sophisticated—bright, earthy, and just a little bit fancy. Honestly, it’s the kind of flavor that makes you pause mid-bite.
- Weeknight to Holiday: Same recipe works for a quick dinner with crusty bread or a showstopper dessert with a drizzle of honey. My in-laws asked for seconds at Thanksgiving, and I served it cold the next morning.
- Leftovers That Don’t Suck: Crispy edges stay crispy when reheated—no soggy pie here. Pack slices for lunch or freeze the whole thing. (Yes, even on a Tuesday night.)
Step-by-step instructions for savory herb-infused apple pie
This method delivers a perfect balance of crisp herb crust and rich, caramelized filling every time.
Prepare the Herb-Infused Crust
In a large bowl, combine the 2.5 cups all-purpose flour and 1 tablespoon granulated sugar. Cut in the 1 cup cold cubed butter using a pastry cutter or your fingers until the mixture resembles coarse crumbs with pea-sized butter pieces remaining. This texture is crucial for flaky layers.
Add the 1 tablespoon finely chopped fresh thyme leaves and 1 tablespoon finely chopped fresh rosemary, mixing just until evenly distributed. Sprinkle in 1 teaspoon flaky sea salt and pulse briefly to combine. Gradually add the ½ cup ice water, 1 tablespoon at a time, mixing gently with a fork until the dough just comes together. Avoid overworking the dough—it should be cool to the touch and hold when pressed.
Assemble and Caramelize the Filling
Preheat your oven to 375°F. In a large skillet over medium heat, melt the 1 tablespoon extra-virgin olive oil. Add the 1 large thinly sliced yellow onion and cook for 8-10 minutes until deeply golden and caramelized. Transfer to a bowl and set aside.
In the same skillet, combine the 4 medium peeled and sliced Honeycrisp apples, ½ cup shredded Gruyère cheese, ½ cup shredded sharp cheddar cheese, ¼ cup packed light brown sugar, and ¼ cup chopped fresh sage leaves. Cook for 5 minutes until the apples begin to soften slightly and release their juices. Remove from heat and stir in the caramelized onions. The filling should be fragrant with apple, herb, and nutty cheese notes.
Build and Bake the Pie
On a lightly floured surface, roll out half of the dough to fit an 9-inch pie dish, leaving a 1-inch overhang. Transfer to the dish and trim the edges. Pour in the apple filling, mounding it slightly in the center. Roll out the remaining dough and place it over the filling, sealing the edges by pressing them together and crimping decoratively.
Brush the top crust generously with the remaining 1 tablespoon granulated sugar mixed with 1 tablespoon water for a golden finish. Cut 3-4 small steam vents in the center. Bake for 45-50 minutes until the crust is deep golden brown and the filling bubbles through the vents. The internal temperature should reach 190°F when checked with an instant-read thermometer.
Rest and Serve
Remove the pie from the oven and let it cool on a wire rack for 1 hour before slicing. This resting period allows the filling to set slightly and the juices to redistribute, preventing a soggy crust. The aroma of caramelized apples and herbs will fill your kitchen—this is your signal that patience has paid off.
Slice into 6 equal wedges and serve warm with a dollop of whipped cream or a sprinkle of additional flaky sea salt. Each bite should deliver crisp herb-infused crust, tender apples, and a perfect balance of sweet and savory flavors. The pie keeps well at room temperature for 2 days or can be refrigerated for up to 4 days—though it's unlikely to last that long!>
Pro Tips For Making Savory Apple Pie
- Pre-Cook the Herbs: DESCRIPTION: Toss thyme and rosemary in a dry pan over medium heat for 30 seconds until fragrant—this wakes up their flavor without burning them. I used to just toss them raw, and the pie smelled good but lacked depth.
- Chill the Dough Twice: DESCRIPTION: Roll out the crust, wrap it, and refrigerate for 30 minutes before filling, then freeze for 15 minutes after adding the apples. The first chill prevents shrinking; the second keeps the filling from making a mess when you cut.
- Sweat Apples First: DESCRIPTION: Slice the apples, toss with 1 tablespoon sugar, and cook in a skillet for 5 minutes before baking—this softens them and caramelizes the edges. Skipping this step means mushy apples and a soggy bottom.
- Brush Butter on Cold: DESCRIPTION: Dot the crust with butter before baking, then brush the top with melted butter after it’s golden. The first layer crisps the bottom; the second adds shine and flavor. I learned this after my first pie came out dry.
Make-ahead tips for leftovers
Pre-Bake Prep
I always prep the crust dough the night before—this is a game-changer for busy days. Wrap the dough tightly in plastic wrap and refrigerate it overnight. The cold temperature prevents gluten development, making it easier to roll out later.
When ready to use, let the dough sit at room temperature for 15-20 minutes before rolling. This trick ensures a flaky, even crust every time without the stress of last-minute prep. 💫
Filling Prep Ahead
The filling can be assembled and refrigerated for up to 24 hours before baking, which is perfect for meal prep. Store it in an airtight container, and when you're ready to bake, simply transfer it directly to the pie dish. This step saves time and ensures the flavors meld beautifully overnight. Just
Freezer-Friendly Crust
For ultimate convenience, freeze the fully assembled pie (before baking) for up to 3 months. Wrap the pie dish tightly in plastic wrap, then aluminum foil. When ready to bake, let it thaw in the refrigerator overnight, then bake as directed. The crust will still come out crisp and golden—no texture loss at all. This is my go-to strategy for holiday gatherings. ❄️
Make-Ahead Slices
Once baked, individual slices can be frozen for up to 3 months by wrapping each piece tightly in plastic wrap. To reheat, place slices on a baking sheet and warm in a 350°F oven for 10-15 minutes.
For extra crispiness, brush the crust with a little olive oil before reheating. The filling stays tender, and the crust regains its perfect texture—just like fresh from the oven.
Timing for Holiday Hosting
For stress-free holiday hosting, bake the pie 2-3 hours before serving. The flavors deepen as it rests, and the crust maintains its crispness. Store it at room temperature in a pie carrier, and it’ll stay warm and delicious.
I like to serve it with a side of sharp cheddar or a dollop of crème fraîche to enhance the savory notes. Your guests will think you spent all day cooking! 🌟
Portioning for Meal Prep
Divide the baked pie into individual portions and store them in airtight containers for easy grab-and-go meals. Reheat slices in the microwave for 30-45 seconds (covered with a damp paper towel) to maintain moisture.
For a crispier reheat, use the oven method mentioned earlier. This approach works perfectly for lunches or light dinners all week long.
Nutrition facts
Frequently asked questions
Can I make this savory apple pie without dairy?
Yes! Replace the Gruyère and cheddar with 1 cup nutritional yeast for a cheesy flavor, or use ½ cup coconut oil-based cheese alternative for a neutral base. For the crust, substitute butter with 1 cup coconut oil or vegan butter—just ensure all ingredients are cold when mixing. The filling will still have great texture, though the nutty depth from Gruyère will be missing.
What's the best way to reheat leftover slices?
For crispy crust and tender filling, reheat slices in a 350°F oven for 10-15 minutes on a baking sheet. Brush the crust lightly with olive oil before reheating to restore crispness. Microwave reheating (covered with a damp paper towel for 30-45 seconds) works for convenience but may soften the crust slightly.
Can I use store-bought pie crust instead?
For a shortcut, use a 9-inch refrigerated pie crust (like Pillsbury) for the bottom layer. For the top, roll out a second crust and brush it with olive oil mixed with 1 tsp water before adding the filling. Skip the sugar glaze—store-bought crusts often have enough sugar already. The herb flavor will still shine through!
Why does my crust turn out tough instead of flaky?
Overworking the dough or using warm butter are the most common culprits. Keep everything cold: chill the dough for 30 minutes before rolling, and use ice water when mixing. Cut butter into flour quickly to create pea-sized pieces, and avoid pressing the crust down when transferring to the pie dish. A flaky crust starts with cold, dry ingredients!
What's the secret to balancing sweet and savory flavors?
The key is the cheese-to-sugar ratio and acidity. Use aged Gruyère (12+ months) for nutty depth, and balance it with brown sugar—it caramelizes better than white sugar. Add 1 tbsp lemon juice to the filling to brighten the apples. Taste as you go: the filling should taste slightly sweet with a sharp, cheesy finish before baking.