
Desserts
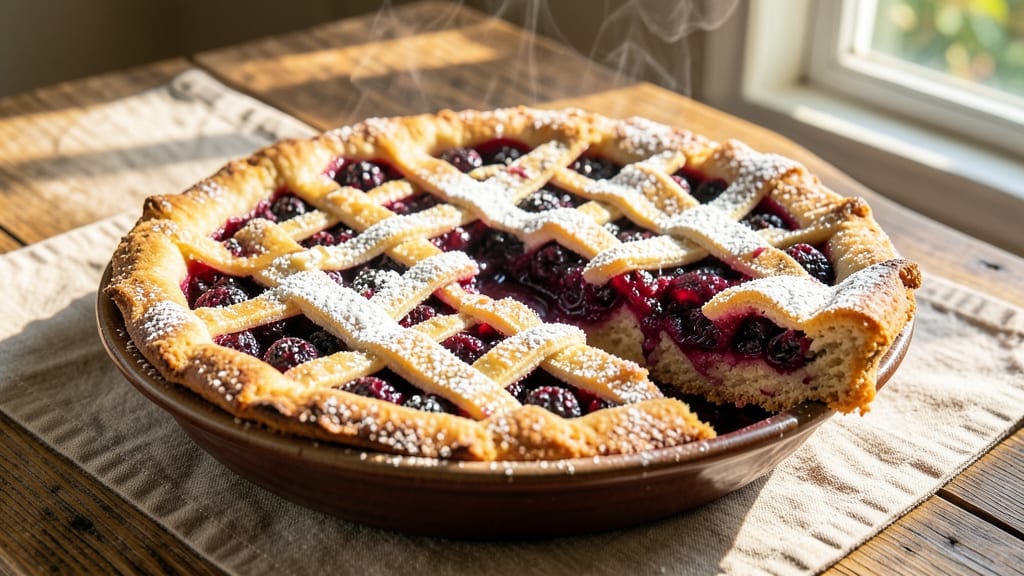
This Amish blackberry pie recipe brings old-world charm to your kitchen with its signature rustic crust and juicy, spiced filling that bursts with summer flavor. 🌟 The secret lies in a simple, flaky crust that holds its shape while the blackberries release their deep, sweet-tart essence—a technique passed down through generations in Pennsylvania Amish communities.
The filling requires no fancy thickeners, just fresh blackberries (or frozen, if needed) tossed with sugar, cornstarch, and a touch of cinnamon for warmth. Baking at 375°F for 45-50 minutes ensures the crust stays crisp while the fruit softens into a luscious, bubbling center—just like Grandma used to make.
What sets this pie apart is its authentic Amish touch: a lattice crust that lets steam escape while keeping the filling tender, and a simple glaze of powdered sugar and lemon juice for that signature shine.
The aroma alone will have everyone gathering around the table before the oven even cools.
Perfect for family gatherings, church potlucks, or a nostalgic dessert night, this pie delivers restaurant-quality results with just a few simple ingredients. Let's get baking—your taste buds will thank you.
Ingredients for amish blackberry pie
These rustic ingredients create a pie that captures Amish baking traditions with every bite.
| Ingredient | Amount | Notes |
|---|---|---|
| Fresh Blackberries 🫐 | 4 cups | Packed, stems removed |
| Granulated Sugar 🍚 | 1 ½ cups | White or light brown preferred |
| Cornstarch 🌾 | 2 tbsp | For thickening filling |
| Ground Cinnamon 🌿 | 1 tsp | Freshly ground for warmth |
| Lemon Juice 🍋 | 1 tbsp | Freshly squeezed |
| Unsalted Butter 🧈 | 1 cup | Cold, cubed for crust |
| All-Purpose Flour 🌾 | 2 ½ cups | Plus 1 tbsp for dusting |
| Diamond Crystal Kosher Salt 🧂 | ½ tsp | For crust and filling |
| Ice Cubes ❄️ | 1 cup | For chilled butter |
| Powdered Sugar 🍚 | ¼ cup | For glaze |
| Heavy Cream 🥛 | 1 tbsp | Optional for lattice brush |
The blackberries should be fresh and plump—local farmers markets in Pennsylvania often carry the best varieties, but frozen works in a pinch (thaw and drain well). For the crust, cold butter is non-negotiable—cut it into cubes and chill for at least 30 minutes before mixing. King Arthur flour is ideal for the crust's flakiness, but any all-purpose brand will work. The cinnamon should be ground fresh if possible, but store-bought works fine—just avoid pre-mixed spice packets that often contain salt. For the lattice, slice the dough into strips about 1/4-inch wide for that classic Amish pattern.
No fresh blackberries? Frozen berries without sugar are perfect—just don't thaw them completely before mixing. Running short on butter? Substitute chilled shortening for a flakier crust, though purists may frown. The cornstarch can be swapped for arrowroot powder at the same ratio. For the glaze, if you prefer a glossier finish, add 1 tsp lemon zest to the powdered sugar mixture. The lattice isn't just decorative—it prevents soggy crust by allowing steam to escape while keeping the filling tender. For extra authenticity, brush the lattice strips with heavy cream before baking.
Store the pie at room temperature for up to 4 hours before serving to let the flavors meld. Once cooled, refrigerate for up to 5 days—the crust stays crisp, and the filling develops deeper flavor. For longer storage, freeze the un-sliced pie for up to 3 months. Reheat slices at 350°F for 10 minutes to restore crispness. The lattice pieces can be prepped ahead and frozen on a tray before assembling—just thaw before using. Leftovers make perfect pie à la mode when paired with vanilla ice cream.
Why You'll Love This Recipe
- No Fuss Filling: I swear by this method—just toss those blackberries with sugar, cornstarch, and a splash of lemon juice, then let them simmer until thick. No blender, no fancy techniques, just a pot and a spoon. Honestly, the filling comes together faster than I can boil water for tea.
- Sweet-Tart Magic: That lemon juice isn’t just for show—it brightens the blackberries so the pie isn’t too heavy. A pinch of cinnamon ties it all together, giving you that warm, spiced depth without overpowering the fruit. Between us, the first slice disappears in two bites.
- Picnic to Potluck: This pie travels like a champ—cool enough for a summer picnic, sturdy enough for a church potluck. (Yes, even on a Tuesday night.) The crust holds up, the filling stays thick, and no one will guess it took less than an hour to make.
- Leftovers? More Like Leftovers: Make one pie, and you’ll have slices for breakfast, lunch, and dessert. The filling thickens just right, so it’s not soggy the next day—perfect for quick breakfasts or sneaking into oatmeal. My kids ask for it more than ice cream, and that’s saying something.
Step-by-step instructions for rustic blackberry pie
This method delivers a lattice-topped pie with a flaky crust and juicy blackberry filling that bursts with every bite.
👨🍳 Step 1: Prepare the Blackberry Filling
In a large mixing bowl, combine the 4 cups fresh blackberries with 1.5 cups granulated sugar and 2 tbsp cornstarch. The sugar should be evenly distributed—this prevents a gritty texture in the finished pie. Add 1 tbsp lemon juice and 1 tsp ground cinnamon, then gently stir until everything is well incorporated. Here's the thing—don't mash the berries yet. You want them to stay intact so they create that signature "bursting" texture when baked.
Transfer the mixture to a large saucepan and place it over medium heat. Add 1 cup ice cubes and cook for 5-7 minutes, stirring constantly, until the ice melts and the filling begins to thicken. You're looking for a consistency similar to applesauce—thick enough to coat the back of a spoon but still slightly loose. Remove from heat immediately to prevent over-thickening, which can make the filling gummy.
🥘 Step 2: Make the Pie Crust
In a food processor, pulse the 1 cup cold unsalted butter (cubed) with 2.5 cups all-purpose flour and 0.5 tsp Diamond Crystal kosher salt until the mixture resembles coarse crumbs with pea-sized butter pieces. Add the 1 tbsp heavy cream (if using) and pulse just until the dough begins to come together. Avoid over-processing or the crust will become tough.
Transfer the dough to a lightly floured surface and divide it into two equal portions. Roll out one portion into a 12-inch circle (about ⅛-inch thick) for the bottom crust. Transfer it to a 9-inch pie dish, pressing gently to shape it into the bottom and up the sides. Trim any excess dough hanging over the edge, leaving about ½-inch overhang. Chill the crust in the refrigerator while you prepare the top.
🔥 Step 3: Assemble and Bake the Pie
Preheat your oven to 375°F. Pour the blackberry filling into the chilled bottom crust, mounding it slightly in the center. Roll out the second portion of dough for the top crust, but instead of placing it directly over the filling, create a lattice pattern by cutting the dough into 1-inch strips and weaving them over the pie. This allows steam to escape while keeping the berries contained. Brush the lattice with a bit of water or 1 tbsp heavy cream to help it crisp up during baking.
Bake the pie for 45-50 minutes until the crust is deep golden brown and the filling is bubbling vigorously at the edges. The filling should be thickened but still juicy—if it looks too dry, tent the pie with foil during the last 10 minutes of baking to prevent over-browning. You'll know it's done when the crust is crisp and the filling has set slightly but still has that glorious "wobble" in the center.
⏰ Step 4: Finish with Glaze and Rest
While the pie is still warm, whisk together the 0.25 cup powdered sugar with 1-2 tbsp water (or more as needed) to create a light glaze. Drizzle this over the hot pie and let it set for 1-2 minutes—this creates that beautiful, glossy finish without making the pie soggy. Real talk: don't skip the glaze. It adds that professional touch that makes your pie look (and taste) restaurant-quality.
Allow the pie to cool completely on a wire rack before slicing. This resting period—at least 2 hours—lets the filling set properly and prevents the juices from running everywhere when you serve it. The crust should be crisp, the lattice perfectly golden, and each slice should deliver that perfect balance of tart blackberries, sweet filling, and flaky crust.
Pro Tips For Making Amish Blackberry Pie
- Prep Berries First: Toss the blackberries with lemon juice before adding sugar—this keeps them bright and prevents that sad, grayish filling. I learned this the hard way after baking a pie where the berries looked dull; the acid locks in color and flavor.
- Simmer the Filling: Cook the sugar-cornstarch mixture until it’s just thickened—about 3-5 minutes over medium heat. If you rush it, the filling will turn gluey; if you overdo it, the pie crust will get soggy. Test by coating the back of a spoon with the mixture—it should hold its shape.
- Skip the Overmixing: Stir the cornstarch into the sugar gently with a fork or rubber spatula—no need to whip it into oblivion. Overmixing makes the filling gummy, and nobody wants a pie that fights back with texture. A few lumps? Doesn’t matter.
- Chill Before Baking: Let the pie filling cool to room temperature (about 30 minutes) before pouring it into the crust. Hot filling steams the crust, making it soggy—trust me, I’ve seen it happen. Patience here means a flaky, not a floppy, bottom.
Essential equipment for great amish blackberry pie
Pie Dish Essentials
A 9-inch glass or ceramic pie dish is your best friend for this recipe—it distributes heat evenly and prevents burning. I prefer Corelle stoneware for its durability and even baking, but any oven-safe dish works.
Avoid dark-colored metal pans, which can make the crust brown too quickly. For a rustic Amish touch, try a cast-iron skillet lined with parchment paper—it adds a smoky depth to the crust. 🔥
Lattice Tools
Creating that iconic Amish lattice pattern is easier with the right tools. A sharp chef's knife (like Wüsthof) and a pastry brush are essential—use the knife to cut clean strips and the brush to apply egg wash or cream for crisp edges.
For precision, a pie lattice cutter (available on Amazon) saves time and ensures even strips every time. If you're feeling creative, use a fork to poke holes in a rolled-out dough disc before cutting strips.
Pastry Cutters
Invest in a pie crust cutter or pastry wheel to make clean, even cuts for your lattice. I love the OXO Good Grips cutter—it glides smoothly through chilled dough without tearing. For a budget option, a plastic pastry cutter works just as well.
Always keep your tools sharp and chilled in the freezer for 10 minutes before cutting to prevent sticking. A dull cutter will crush the dough, making your lattice look uneven.
Baking Equipment
An oven thermometer is non-negotiable—home ovens can vary by 25°F or more from the set temperature. I recommend the Thermoworks Oven Thermometer for accuracy. For even baking, place your pie on the middle rack of your oven.
If your oven runs hot, tent the pie with aluminum foil during the last 10 minutes to prevent over-browning. A wire cooling rack is crucial for letting air circulate underneath while the pie cools.
Glazing Supplies
A fine-mesh sieve helps create a smooth powdered sugar glaze without lumps. For a glossy finish, mix the powdered sugar with 1-2 tbsp water or lemon juice until it reaches a drizzling consistency. I keep a small bowl and pastry brush handy for applying the glaze right after baking.For extra flair, add 1 tsp lemon zest to the glaze mixture—it brightens the flavors and adds a pop of color. 💫
Nutrition facts
Frequently asked questions
Can I use frozen blackberries instead of fresh?
Frozen blackberries work perfectly—just thaw them first and drain any excess liquid to prevent a watery filling. For best results, use unsweetened frozen berries and don't skip the cornstarch thickening step. The texture will be just as delicious when baked.
Why does my Amish blackberry pie crust turn soggy?
Soggy crust usually happens when the filling releases too much moisture. The lattice design helps prevent this by allowing steam to escape, but if your pie still gets soggy, try baking the bottom crust alone (blind-baked) for 10 minutes before adding filling. Also ensure your oven isn't too hot—375°F is perfect for even baking.
What's the secret to a flaky crust?
The key is keeping everything cold! Use cold butter (cut into cubes and chilled for 30+ minutes) and work quickly when mixing. Avoid over-processing the dough, and don't roll it out too thin. For extra flakiness, try substituting 1/4 cup shortening for butter in the crust recipe—Amish bakers swear by this trick for that signature texture.
Can I make this pie ahead of time?
Yes, this pie actually tastes better the next day! Assemble it completely (including the lattice), then refrigerate uncovered for 12 hours to let flavors develop. Bake straight from the fridge—just add 5-10 minutes to your baking time. For serving later, store at room temperature for up to 4 hours or refrigerate for 3-4 days covered with plastic wrap.
How do I fix a cracked lattice top?
Don't worry—it's common! If your lattice cracks during baking, simply brush the broken pieces with egg wash or melted butter after baking and press them back into place. For extra repair, use a small amount of apricot jam as \"glue\" between pieces. The pie will still look beautiful and taste just as good—Amish bakers often embrace these little imperfections as part of the charm!