
Desserts
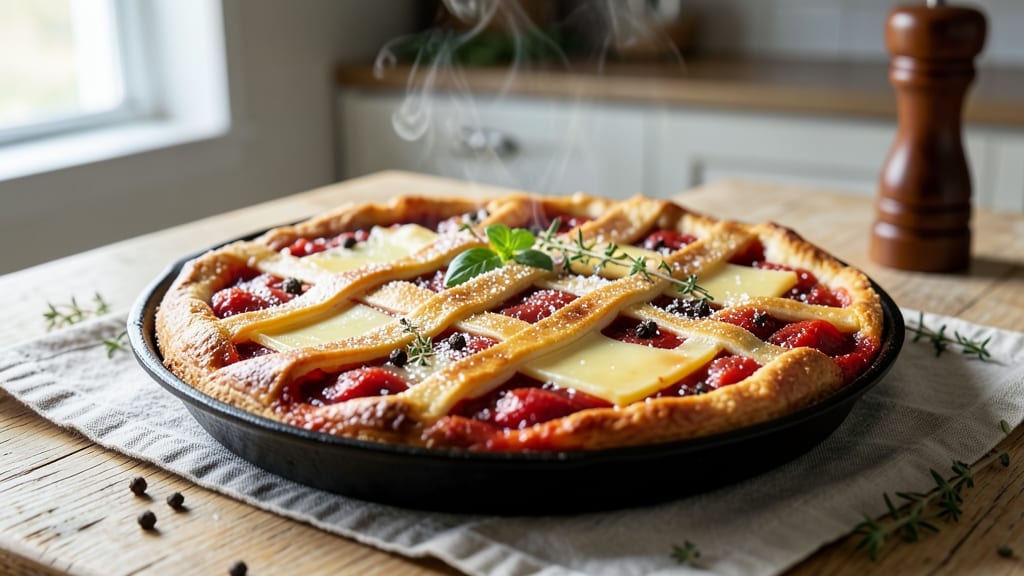
This Alabama tomato pie recipe brings a taste of the South to your kitchen with its perfect balance of sweet and tangy flavors. 🌟 Born from Alabama's rich culinary traditions, this savory pie features layers of fresh tomatoes, creamy cheese, and aromatic herbs—all baked until golden and bubbling.
It's the kind of dish that feels like a warm hug from a Southern grandmother, combining simplicity with deep, comforting flavors that make it a standout dessert or even a light main course.
The beauty of this recipe lies in its versatility—whether you prefer an open-faced version or a fully enclosed pie, the technique remains the same. Store-bought crusts work perfectly, but a homemade one adds that extra layer of authenticity.
The filling is where the magic happens: ripe tomatoes, sharp cheddar, and a touch of sugar create a harmonious blend of sweetness and tang, while herbs like thyme or basil add a fresh, aromatic note that elevates every bite.
Baking this pie is straightforward, but the result is anything but ordinary. The crust turns golden and crisp, while the filling develops a caramelized top that's impossible to resist. The texture is creamy yet slightly firm, with the tomatoes holding their shape just enough to offer a satisfying bite.
It’s the kind of dish that tastes even better the next day, making it perfect for meal prep or a special gathering.
Serve it warm with a drizzle of olive oil and fresh herbs for a touch of elegance, or enjoy it at room temperature for a lighter option.
This Alabama tomato pie isn’t just a recipe—it’s a celebration of Southern comfort food, and once you try it, you’ll understand why it’s a beloved classic. Let’s get started!
Ingredients for alabama tomato pie
Six ingredients make the filling, and a few more bring the crust to life.
| Ingredient | Amount | Notes |
|---|---|---|
| Fresh Tomatoes 🍅 | 4 lbs | Ripe, firm, and preferably heirloom |
| Sharp White Cheddar Cheese 🧀 | 1 ½ cups | Shredded, full-fat preferred |
| All-Purpose Flour 🌾 | 2 cups | For pie crust, plus 1 tbsp for dusting |
| Unsalted Butter 🧈 | 1 cup | Cold, cubed for crust |
| Ice Water 💧 | ½ cup | For pie crust |
| Granulated Sugar 🍚 | ¼ cup | For balancing sweetness |
| Fresh Thyme Leaves 🌿 | ¼ cup | Or 1 tbsp dried thyme |
| Fresh Basil Leaves 🌿 | ¼ cup | Chopped, for freshness |
| Garlic Cloves 🧄 | 4 cloves | Minced, for depth |
| Extra-Virgin Olive Oil 🫒 | ¼ cup | For drizzling |
| Salt 🧂 | 1 ½ tsp | Kosher or sea salt |
| Black Pepper 🌶️ | ½ tsp | Freshly ground |
| Baking Powder 🍞 | 1 tsp | For crust leavening |
| Egg 🥚 | 1 whole | For egg wash |
The tomatoes are the heart of this pie, so grab the riest, firmest ones you can find—local farmers markets usually have the best. Heirloom varieties add that classic Southern flavor, but regular beefsteak tomatoes work too. The cheese? Sharp white cheddar is non-negotiable—it needs that tang to balance the sweetness. For the crust, King Arthur flour or Gold Medal is my go-to, but any all-purpose will do. If you're short on time, Pillsbury pie crust works perfectly—just add a pinch of salt to the filling since it's already seasoned.
No fresh thyme? Dried works at one-third the amount, but fresh is ideal. Basil is optional but worth it—it adds that bright, fresh note that makes this pie feel special. Short on garlic? Garlic powder at half the amount gets you close. The sugar is key here—don't skip it, but don't overdo it either. 1/4 cup is perfect for balancing the tomatoes' natural sweetness. If you're making this ahead, prep the filling the night before—it tastes even better after sitting overnight.
The crust keeps best at room temperature in an airtight container for 2 days, but honestly, it's better made fresh. The filling? 3 days in the fridge, though it's even more delicious the next day. Freeze the whole pie for up to 3 months—just thaw overnight in the fridge. I always make a double batch because it disappears fast. Leftovers? Warm them gently in the oven with a drizzle of olive oil—like a second breakfast.
Why You'll Love This Recipe
- No-Fuss Assembly: I swear, this crust comes together in minutes—just flour, butter, and ice water. No rolling, no fuss, and no waiting for dough to chill. That’s right, even if you burned your last pie attempt, this one’s forgiving.
- Cheese-Tomato Magic: Sharp cheddar melts into gooey perfection while the tomatoes caramelize just enough to balance the salt. It’s tangy, rich, and somehow better the next day—like a grown-up grilled cheese meets Southern comfort.
- Weeknight to Potluck: Make it for a lazy Tuesday dinner or double the batch for a picnic. The slices stay crispy enough to pack, and the flavor holds up—no sad, soggy leftovers here. (Yes, even on a Tuesday night.)
- Budget-Friendly Feast: Tomatoes and cheddar stretch farther than you’d think, and the crust costs pennies. I’ve fed six people for under $10, and no one ever asks for seconds—because they keep asking for more.
Step-by-step instructions for Alabama tomato pie
Here's how to make this iconic Southern dessert with a perfect balance of sweet and tangy.
👨🍳 Step 1: Prepare the Tomato Filling
Start by halving the 4 lbs fresh tomatoes and removing the cores. Chop them into ½-inch chunks—you should have about 6 cups of prepared tomatoes. Transfer them to a large bowl and stir in the 0.25 cup granulated sugar, 1.5 tsp salt, and 0.5 tsp black pepper.
Add the 0.25 cup fresh basil leaves and 0.25 cup fresh thyme leaves, then mix gently to distribute the herbs. Let the mixture sit at room temperature for 15 minutes—this allows the flavors to meld and the tomatoes to release their juices. You'll see the mixture darken slightly as the sugar begins to draw out moisture.
In a separate small bowl, whisk together 1.5 cups shredded sharp white cheddar cheese, the 4 minced garlic cloves, and 0.25 cup extra-virgin olive oil. Fold this mixture into the tomato preparation, stirring until the cheese is completely melted and the filling has a creamy, chunky texture. This step is where the pie gets its signature depth of flavor—don't skip it!
🍳 Step 2: Make the Pie Crust
In a large mixing bowl, combine the 2 cups all-purpose flour, 1 tsp baking powder, and 1.5 tsp salt. Cut in the 1 cup cold cubed unsalted butter using a pastry cutter or your fingers until the mixture resembles coarse crumbs with pea-sized butter pieces remaining.
Drizzle in the 0.5 cup ice water all at once and stir with a fork until the dough just comes together. Be careful not to overmix—just combine until the dough forms a shaggy mass. Turn the dough out onto a lightly floured surface and gently knead it 4-5 times to smooth it out. Wrap it in plastic and refrigerate for 30 minutes to firm up.
Roll out the chilled dough between two sheets of parchment paper to about ⅛-inch thickness. Carefully transfer it to a 9-inch pie dish, trimming any excess dough hanging over the edges. Crimp the edges with your fingers or a fork to create a decorative border. Pre-bake the crust for 10 minutes at 375°F until it's lightly golden. Prick the bottom with a fork to prevent puffing.
🥘 Step 3: Assemble and Bake the Pie
Pour the prepared tomato filling into the pre-baked crust, spreading it evenly. The filling should come about ½-inch from the top edge—this allows for some expansion during baking. Brush the crust edges with the 1 whole egg beaten with 1 tablespoon water for a golden finish.
Bake at 375°F for 45-50 minutes until the filling is bubbling and the crust is deep golden brown. If the top starts to brown too quickly, tent loosely with aluminum foil. The pie is done when the filling is set but still slightly jiggly in the center—it'll firm up as it cools.
Here's the thing—don't overbake. You want that perfect balance of set filling and tender crust. Let the pie cool completely on a wire rack for at least 2 hours before slicing. This resting time allows the flavors to meld and prevents a runny filling when you serve it.
🍽️ Step 4: Serve with Confidence
Slice the pie into 6 equal wedges (about ⅙ of the pie each) using a sharp chef's knife. The crust should be crisp and flaky, while the filling should be creamy with pockets of melted cheese. Serve at room temperature for the best texture and flavor combination.
This pie tastes even better the next day as the flavors continue to develop. Store leftovers covered at room temperature for up to 3 days. For an extra-special touch, drizzle each slice with a little more extra-virgin olive oil before serving—it enhances the tomato flavor beautifully.
Pro Tips For Making Alabama Tomato Pie
- Pre-Cook Your Tomatoes: I learned this the hard way—raw, watery tomatoes will make your pie soggy. Simmer them in a pot for 10-15 minutes until they break down into a thick, jam-like consistency. This cuts the water content and intensifies the flavor, so your crust doesn’t turn into a soggy mess.
- Grate the Cheese Fresh: Pre-shredded cheese has anti-caking agents that don’t melt the same way. Grab a box of sharp white cheddar and grate it yourself—it melts smoother and packs more flavor. If you’re in a pinch, at least shake the bag to fluff it up before using.
- Blind-Bake the Crust: Skip the par-baking shortcut—this pie needs a sturdy base. Weigh down the crust with pie weights or dried beans, then bake at 375°F (190°C) for 15 minutes before adding fillings. This prevents shrinking and ensures a crispy, not floppy, crust.
- Use Cold Butter in Dough: Cut the butter into flour in small cubes, not chunks—this creates more surface area for even distribution. Keep everything cold (even the water) until the dough comes together, or you’ll end up with a tough, greasy mess instead of a flaky crust.
Essential equipment for great alabama tomato pie
Pie Dish Essentials
For this Alabama tomato pie, a 9-inch pie dish is ideal—it provides enough space for the filling to spread while keeping the crust proportionate. I recommend using a ceramic or glass dish (like Corelle or Pyrex) because they distribute heat evenly and prevent soggy bottoms.
If you prefer metal, a heavy-gauge aluminum pie pan from Wilton works well, but avoid thin pans that can warp.
For an open-faced variation, use a baking sheet or cast-iron skillet (like Lodge)—just brush the bottom with olive oil first to prevent sticking.
The key is ensuring your dish has ventilation (like slits or holes) if you’re baking uncovered, so steam can escape and the crust doesn’t get soggy. 🌟
Crust Tools
A rolling pin is a must for achieving that ⅛-inch thickness in the crust, but if you’re short on time, a wine bottle or even a smooth-sided pan works in a pinch.
For shaping, I love using parchment paper—it prevents sticking and makes transferring the dough into the pie dish effortless. If you’re making a homemade crust, a pastry cutter (or two forks) helps distribute the butter evenly in the flour.
For the edges, a fork or your fingers work great for crimping, but if you want a professional finish, a pie crust wheel or dough scraper adds a clean, decorative border.
Pre-baking the crust is optional but recommended—it prevents a soggy bottom, especially if your filling is juicy. Just bake it for 10 minutes at 375°F before adding the filling. ⏰
Mixing and Measuring
For the filling, a large mixing bowl (like Pyrex) is perfect for combining the tomatoes, cheese, and herbs. A microplane is ideal for grating the cheese quickly, but a box grater works too—just avoid pre-shredded cheese, as it contains anti-caking agents that can make the filling watery.
A measuring cup set (like OXO Good Grips) ensures accuracy, especially for the ¼ cup sugar and ½ cup olive oil.
For mincing garlic, a garlic press is my go-to, but a sharp chef’s knife works if you prefer to chop it finely. A wooden spoon or rubber spatula helps fold the cheese into the tomatoes gently, preventing the filling from breaking down.
Don’t skip the 15-minute rest for the filling—it lets the flavors meld and the tomatoes soften just enough for the perfect texture. 💫
Baking and Serving
An oven thermometer (like Thermoworks) is a game-changer—it ensures your oven is truly at 375°F, not the "guess-timate" setting. For baking, a wire cooling rack is essential for letting the pie cool evenly without steaming.
If you’re short on racks, a baking sheet lined with parchment works, but avoid placing the pie directly on the counter—it can trap moisture and make the crust soggy.
For serving, a sharp chef’s knife (like Wüsthof) makes clean slices, and a pie server adds a decorative touch. A drizzler bottle (or even a spoon) is perfect for adding that final olive oil garnish.
And if you’re making this ahead, a vacuum sealer keeps the pie fresh for up to 3 months in the freezer—just thaw overnight for the best results. 🍴
Nutrition facts
Frequently asked questions
Can I use canned tomatoes instead of fresh?
Fresh tomatoes give the best texture and flavor, but you can use canned in a pinch! Drain and rinse 2 (28 oz) cans of whole peeled tomatoes first, then chop them finely. Add 1 extra tablespoon of sugar to compensate for the lack of natural sweetness. For even better results, simmer the canned tomatoes with ½ cup water for 10 minutes to soften them before mixing with the cheese.
Why does my crust get soggy?
Soggy crusts happen when steam gets trapped—usually from undercooked filling or no pre-bake. Always pre-bake your crust for 10 minutes at 375°F before adding filling. If using store-bought crust, look for \"vented\" options or poke holes in the bottom. For extra insurance, sprinkle ½ cup crushed cornflakes or 1 tbsp all-purpose flour on the crust before adding filling to absorb moisture.
Can I make this pie ahead of time?
This pie actually tastes better the next day as flavors meld. Assemble the pie 1 day ahead and refrigerate uncovered. Bake it 20 minutes longer than usual (about 65-70 minutes total) to compensate for the cold start. For freezing, bake completely, cool, wrap tightly in plastic, and freeze for up to 3 months. Thaw overnight in the fridge before serving.
What cheese works best besides sharp white cheddar?
Sharp white cheddar is traditional, but you can use Monterey Jack (milder, creamier) or Gouda (nutty depth). For extra richness, mix 1 cup cheddar with ½ cup cream cheese—it adds a velvety texture. Avoid pre-shredded cheese (it contains anti-caking agents that make the filling watery). If you love feta, try ½ cup crumbled feta for a tangy twist, but reduce the sugar to 2 tablespoons.
How do I make an open-faced version?
Skip the top crust entirely for an open-faced style! Use a cast-iron skillet or baking sheet brushed with olive oil. Spread the filling in a ½-inch thick layer and bake at 375°F for 30-35 minutes until bubbly and golden. Let cool slightly, then top with fresh herbs. This version is perfect for sharing—just slice into wedges after baking. For extra crunch, sprinkle ½ cup panko on top before baking.