
Desserts
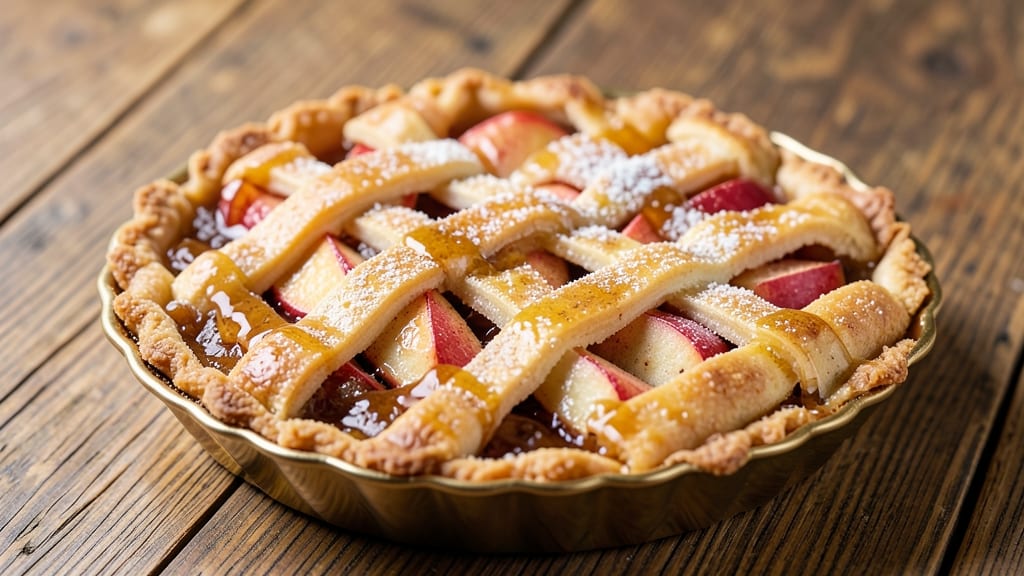
This 5-inch mini apple pie recipe delivers all the cozy, spiced apple goodness you love—just in a perfectly portable size. 🍏 The secret to these handheld pies lies in a buttery, flaky crust that stays crisp even when you bite into warm, caramelized apple filling.
I developed this recipe after years of making full-sized pies, scaling down the proportions to create something that’s equally satisfying but far more convenient for gatherings or a quick dessert fix.
The beauty of mini pies is their versatility—you can prep the dough ahead, assemble them the day of, and bake a batch in under 30 minutes at 375°F. The filling balances tart apples with cinnamon, sugar, and a touch of lemon juice to keep it bright.
The crust, rolled out just ⅛-inch thick, creates that signature flaky texture while holding its shape beautifully. Whether you’re serving them at a holiday party or enjoying one as a solo treat, they’re designed to disappear fast.
What makes these mini apple pies truly special is how they transform a classic dessert into something interactive. Guests can pick them up, take a bite, and savor the warm, spiced apple filling without the mess of a full pie.
The edges stay golden and crisp, while the center remains tender—just like your favorite bakery version. Top them with a simple powdered sugar dusting or a drizzle of caramel for extra indulgence.
Perfect for meal prep, potlucks, or a comforting weeknight dessert, these mini pies prove that great baking doesn’t have to be complicated. With just a few simple ingredients and a little patience, you’ll have a batch of handheld comfort that’s sure to impress. Let’s get baking!
Ingredients for 5 inch mini apple pie
Buttery crust, spiced apples, and handheld convenience—everything you need for perfect mini pies.
| Ingredient | Amount | Notes |
|---|---|---|
| All-Purpose Flour 🌾 | 2 ½ cups | Sifted for flaky crust |
| Unsalted Butter 🧈 | 1 cup | Cold, cubed for best texture |
| Granulated Sugar 🍚 | ½ cup | For crust and filling |
| Ice Water 💧 | ⅓ cup | Chilled for dough handling |
| Salt 🧂 | ½ tsp | Fine sea salt preferred |
| Apples 🍏 | 4 medium | Peeled, cored, sliced thin |
| Ground Cinnamon 🌿 | 2 tsp | Freshly ground for warmth |
| Lemon Juice 🍋 | 1 tbsp | Freshly squeezed, bright flavor |
| Brown Sugar 🍚 | ¼ cup | Packed for filling depth |
| Powdered Sugar 🍚 | ¼ cup | For dusting finished pies |
| Vanilla Extract 🌸 | ½ tsp | Pure vanilla for aroma |
The butter is non-negotiable here—European-style unsalted gives the flakiest crust. Plugrá or Land O'Lakes work great, but if you can find President or Échiré at specialty stores, it's worth the splurge. Keep everything cold while mixing the dough—cold butter and ice water are your best friends for that signature layering. Apples are the star, so pick firm ones like Granny Smith or Honeycrisp—they hold up best when sliced thin. I always peel mine (the skin can get tough when baked), but if you prefer rustic texture, leave it on.
No vanilla extract? Vanilla bean paste works too, or even a pinch of vanilla sugar. Short on brown sugar? Substitute granulated at half the amount, but you'll lose that caramelized depth. The cinnamon can be swapped for pumpkin pie spice if you're out, but it won't be exactly the same. For the apples, pre-sliced bags from the store save time—just drain them well before mixing with filling. And if you're feeling fancy, add a pinch of nutmeg to the filling. Trust me on that.
Dough keeps 3 days wrapped in plastic in the fridge or 3 months frozen. The filling can be prepped ahead too—store it in an airtight container for 2 days. Baked pies stay fresh 2 days at room temperature if you keep them in an airtight container. Freeze unbaked pies on a tray first, then transfer to a bag—bake straight from frozen, adding 5-10 minutes to the time. These are perfect for meal prep: assemble the dough ahead, then bake fresh batches throughout the week.
Why You'll Love This Recipe
- No-Fuss Dough: I swear by the cold butter + ice water trick—it keeps the crust tender without overworking. Five minutes of mixing, one chill in the fridge, and you’re golden. (Yes, even when my hands are sticky from diced apples.)
- Caramelized Apple Magic: That sugar-butter blend turns into a glossy, buttery syrup while the apples soften—just enough bite, not mushy. Honestly, the first bite makes me forget about store-bought pies.
- Portion Control Perfection: Five-inch size? Ideal for picnics, potlucks, or "just me" nights. No awkward slices—everyone gets their own perfect little treat. (My book club requests them yearly.)
- Budget-Friendly Batch: Flour, butter, sugar—basic pantry staples that stretch. Make a dozen, freeze extras, and you’ve got dessert for months. Between us, this is how I feed a crowd for under $15.
Step-by-step instructions for handheld mini apple pies
Perfectly flaky crusts and spiced apple filling in bite-sized portions—here's how to make them shine.
👨🍳 Step 1: Make the Buttery Crust Dough
In a large bowl, combine the 2.5 cups all-purpose flour and 0.5 tsp salt. Cut in the 1 cup unsalted butter (still cold) using a pastry cutter or your fingers until the mixture resembles coarse crumbs with pea-sized butter pieces. This texture is crucial—it creates flaky layers later.
Add 0.5 cup granulated sugar and mix until evenly distributed. Slowly pour in the 0.33 cup ice water while stirring with a fork. The dough will come together when you can form a shaggy mass. Gather it into a ball, flatten into a disk, wrap in plastic, and chill for at least 1 hour (or up to 2 days). The cold rest prevents shrinking and makes rolling easier.
🍳 Step 2: Prepare the Apple Filling
Peel, core, and thinly slice the 4 medium apples (about ¼-inch thick). Toss them in a bowl with 1 tbsp lemon juice, 2 tsp ground cinnamon, 0.25 cup brown sugar, and 0.5 tsp vanilla extract. Mix gently but thoroughly—this brightens the apples and balances their natural sweetness. Let the mixture sit for 10 minutes while you roll out the dough.
Here's where the magic happens: The lemon juice prevents browning while the cinnamon and vanilla build warm, aromatic layers. Don't skip the resting time—the apples will release juices that blend perfectly with the spices.
🥘 Step 3: Roll and Assemble the Pies
Preheat your oven to 375°F. On a lightly floured surface, roll out half the chilled dough to 1/8-inch thickness. Use a 5-inch round cutter (or glass) to cut 6 circles. Press each into a 5-inch mini pie pan (or greased muffin tin), trimming excess dough. The dough should reach ½-inch up the sides—this gives you that classic pie shape.
Spoon about 2 tablespoons of apple filling into each crust, mounding it slightly in the center. Roll out the remaining dough and cut another 6 circles. Place these on top, crimping the edges with a fork to seal. Poke a few tiny holes in the top crust for steam to escape—this prevents soggy bottoms.
🔥 Step 4: Bake to Golden Perfection
Bake the pies for 25-30 minutes until the crusts are deep golden brown and the filling bubbles through the vents. The edges should look crisp while the centers remain slightly soft (they'll firm up as they cool). If the tops brown too quickly, tent loosely with foil after 15 minutes to prevent burning.
Here's the thing—mini pies bake faster than full-sized ones, but they need that golden color to develop proper flavor. The filling should be thick but not dry; if it looks too runny, the oven temperature might be too low. Let them cool for 10 minutes before transferring to a wire rack.
⏰ Step 5: Dust and Serve Warm
While still warm, dust the tops generously with 0.25 cup powdered sugar using a fine-mesh sieve. This creates that signature "snowed" look while adding a delicate sweetness. Serve immediately with vanilla ice cream or whipped cream for the ultimate handheld comfort experience.
Real talk: These pies taste best fresh from the oven when the crust is still crisp and the filling is warm. If storing, keep them in an airtight container for up to 3 days—just reheat in a 350°F oven for 5 minutes to restore that bakery-fresh crunch.
Pro Tips For Making 5 Inch Mini Apple Pie
- Chill the Dough First: I learned this the hard way—rolling out cold dough for mini pies saves you from a sticky mess. Wrap the dough in plastic and refrigerate for at least 30 minutes before cutting circles, or it’ll stretch unevenly and tear when you press it into those tiny molds.
- Cut Butter in Cold: The butter in your crust shouldn’t look like soup. Use ice-cold cubes straight from the fridge and pulse them in the food processor (or cut with a knife) until they’re pea-sized—no smaller. This guarantees flaky layers instead of a dense, greasy disaster.
- Prevent Overfilling the Pies: Five inches isn’t much space. Pack the apples loosely—about ¼ cup per pie—so they don’t spill over when baking. Crowd them, and you’ll end up with soggy bottoms and a mess to clean off the pan.
- Use a Parchment Slip: Line the muffin tin with parchment circles cut to fit, then nestle the pie shells inside. No more scraping burnt crust off the tin, and the pies release cleanly. (Yes, even if you’re impatient—trust me, it’s worth the 2 minutes.)
Essential equipment for 5 inch mini apple pie
Mini Pie Pans
Invest in a set of 5-inch mini pie pans—they're the secret to perfect proportions. I recommend Wilton Mini Pie Pans (about $15 for a 6-pack) or Nordic Ware Mini Pie Pans for their even heat distribution.
If you're using muffin tins instead, grease them well with butter or baking spray to prevent sticking. For a rustic look, try ceramic mini tart pans (like Le Creuset) that double as serving dishes. 🍰
Pie Cutter & Rolling Pin
A 5-inch round cutter is essential for clean, uniform circles. Look for Wilton's Silicone Pie Cutter (flexible and easy to clean) or a stainless steel cutter for precision. For rolling dough, a French-style rolling pin (like OXO Good Grips) gives you better control than wooden pins.
If you don't have a cutter, a glass or metal bowl of the right size works in a pinch. Keep your rolling surface lightly floured to prevent sticking.
Pastry Brush
A high-quality pastry brush (I use King Arthur's Silicone Pastry Brush) is your best friend for brushing egg wash or melted butter on crusts. Avoid cheap brushes—they shed bristles into your dough.
For a golden finish, mix 1 egg yolk with 1 tbsp water for the wash. Brush the tops just before baking for that bakery-style shine. 🌟
Fine-Mesh Sieve
Dusting powdered sugar requires a fine-mesh sieve (like Norpro's Stainless Steel Sieve) to create that signature snowy effect. Avoid shaking directly from the bag—it clumps and looks uneven. For extra flair, sift the sugar over a parchment-lined tray first, then sprinkle onto the pies.
A small round sieve (about 4-inch) works best for mini pies. Keep it clean to prevent sugar buildup.
Digital Meat Thermometer
While not traditional, a digital thermometer (like Thermoworks Smoke) helps ensure your pies are perfectly baked. Insert it into the center of a pie—when it reads 190-195°F, the filling is set but still tender.
This prevents overbaking, which can make crusts tough. For mini pies, 25-30 minutes at 375°F is ideal, but timing varies by oven. A thermometer takes the guesswork out of it. 🌡️
Make-Ahead Tools
Save time with airtight containers (like Rubbermaid Brilliance) for storing dough and filling. For freezing, use quart-sized freezer bags—they stack neatly and prevent freezer burn. Label everything with dates to track freshness.
A sharp chef's knife (like Mercer Culinary) is essential for peeling and slicing apples efficiently. Keep a cutting board (preferably bamboo or plastic to avoid dulling knives) nearby for prep work. 📅
Nutrition facts
Frequently asked questions about mini apple pies
Can I make these mini apple pies without a pie cutter?
Use a 5-inch round glass or metal bowl to cut your dough circles instead. Press the bowl firmly into the rolled-out dough and rotate to create clean edges. For extra precision, trace around a small plate that's the right size. Just be sure to re-chill the dough between cuts if it starts to soften.
Why did my mini pie crusts turn out puffy instead of flat?
Puffy crusts usually happen when the dough isn't chilled long enough or the butter melts during baking. Always chill the dough for at least 1 hour before rolling, and press it firmly into the pans to remove air pockets. If using a muffin tin, make sure it's well-greased so the dough doesn't stick and expand unevenly.
How do I prevent soggy bottom crusts in mini pies?
Prevent soggy bottoms by pre-baking the crusts for 5 minutes at 375°F before adding filling. Poke a few holes in the top crust with a fork to let steam escape. For extra insurance, sprinkle a thin layer of granulated sugar between the crusts before adding filling—it helps absorb moisture.
Can I use frozen apples instead of fresh?
Yes, but thaw and drain them first! Frozen apples work well, but they release more moisture. After thawing, pat them completely dry with paper towels before mixing with the filling. You may need to reduce the lemon juice slightly since frozen apples are often pre-treated to prevent browning.
How many mini pies does this recipe make?
This recipe makes 12 mini apple pies (6 crusts × 2 layers). Each pie uses about 2 tablespoons of filling, making them perfect for appetizers or individual servings. For a party, double the recipe—just scale up your equipment too (like using two muffin tins at once).